Deploy a Workflow App
Turn a saved workflow version into a live App from the editor or the Deployments page, then tour every tab of the App page.
Deploying a workflow creates an App: a hosted endpoint with its own hostname, run history, traces, and monitoring. You can deploy straight from the workflow editor or from the Deployments page; the result is the same App page either way.
Before you start
- Your Workflow must have at least one saved version. Workflows with zero versions do not appear in the deploy picker.
- If you want the endpoint protected (recommended), you need an Access Key to call it afterwards.
Deploy from the workflow editor
Click Deploy in the editor
Open your Workflow and click Deploy in the editor toolbar.

A panel opens with a segmented control: New deployment creates a fresh App; Existing deployment redeploys a new version onto an App that already serves this workflow. If the workflow already has Apps, Existing deployment is preselected.
Fill in the deployment form
The Add new deployment panel asks for:
- Source agent — the workflow to deploy (prefilled when you start from the editor) and its version.
- Name — the App name (defaults to the workflow name).
- Description — optional, up to 512 characters.
- Runtime — the execution runtime version the App runs on.
- Endpoint Authorization — the Require an API token to access the deployment endpoint checkbox. Checked makes the App private (Bearer Access Key required); unchecked makes it public.
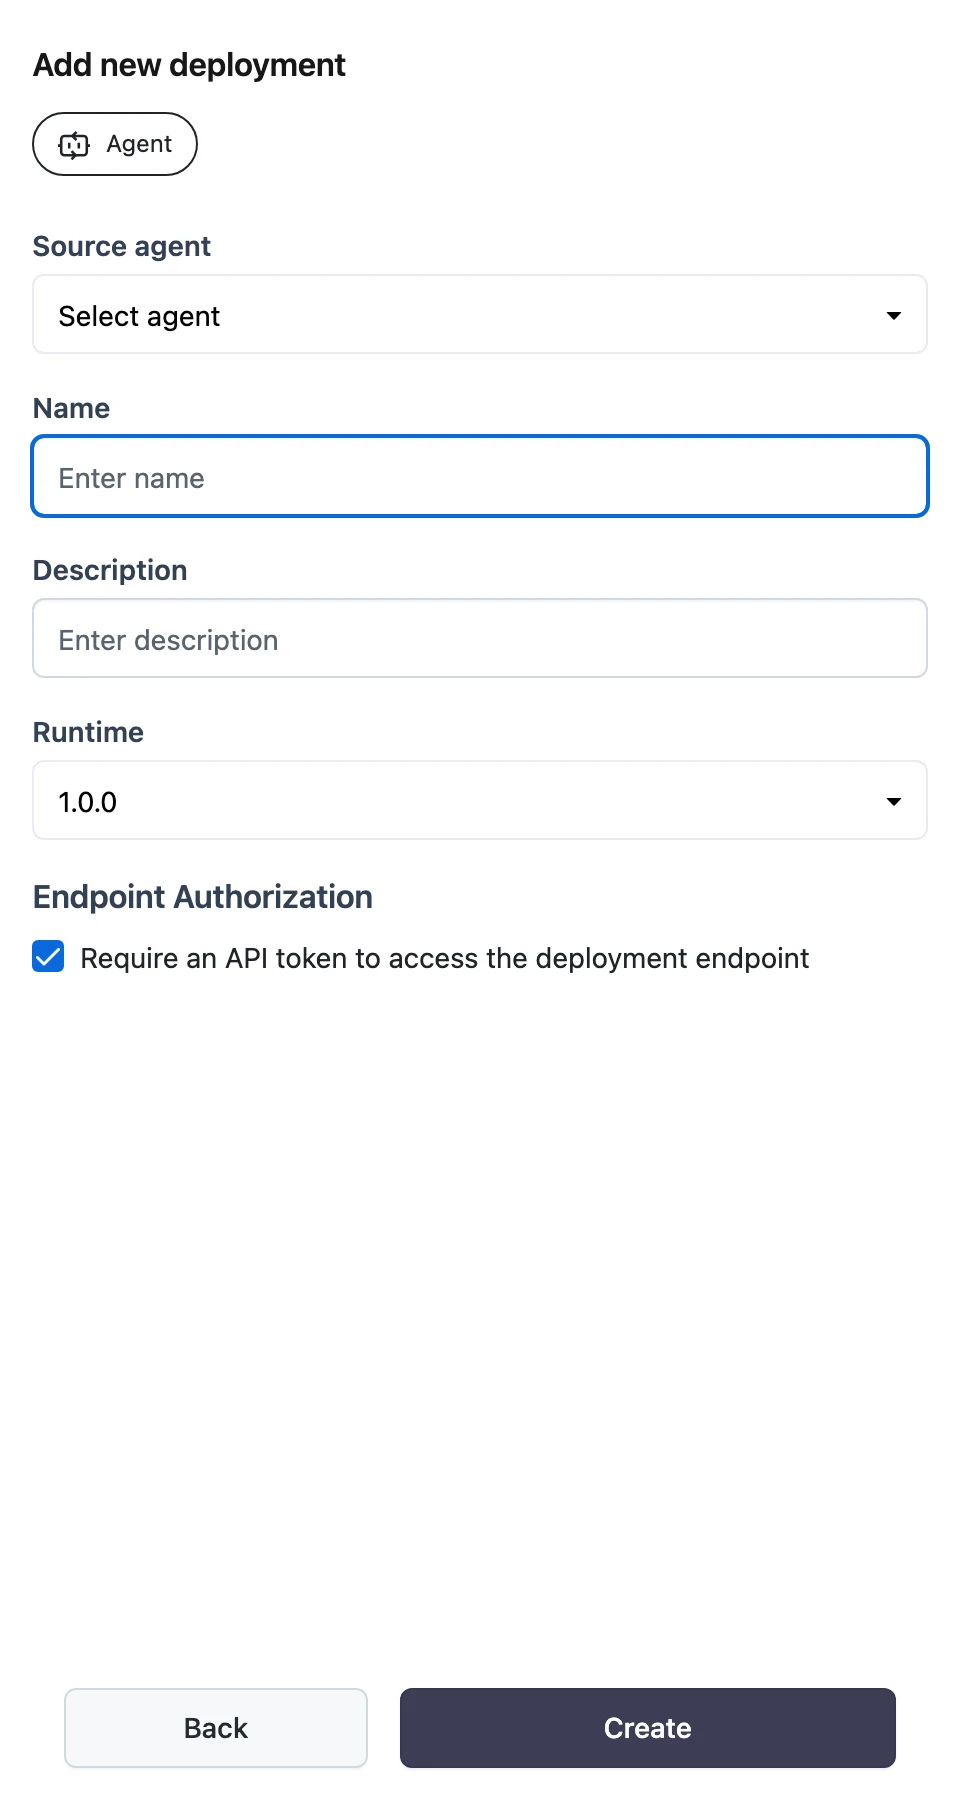
Create
Click Create. You see a "Deployment was created" confirmation and land on the new App page. The App starts serving on its hostname right away — there is no separate "start" step.
You can also start from Deployments → Add new deployment, pick the Agent type, click Next, and fill in the same form.
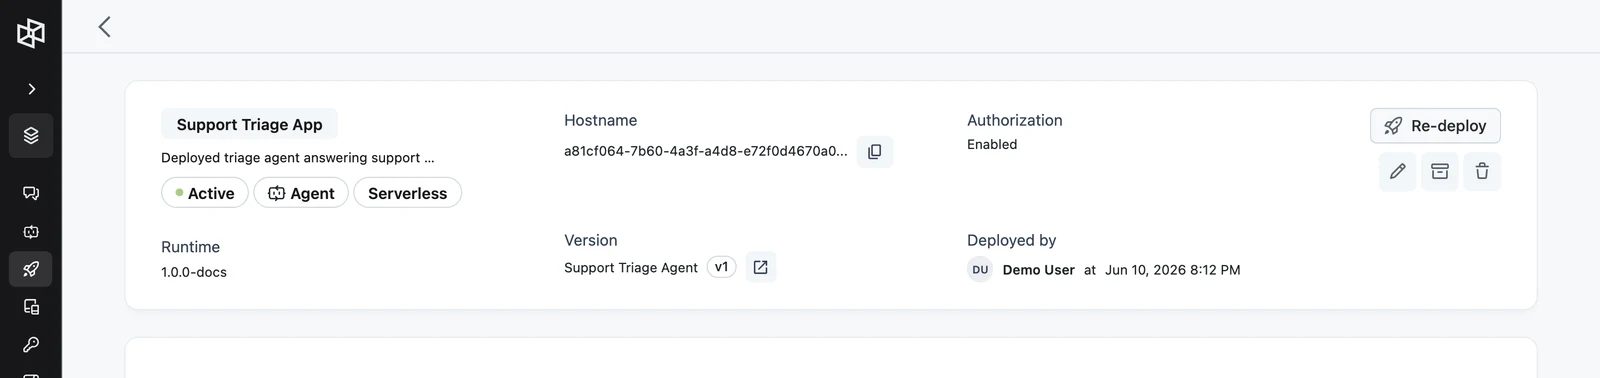
The App page header
The header summarizes the App and is where you grab the hostname:
- Name, description, and status — Active or Archived, plus an Agent type label and a Serverless / Server-based label.
- Runtime — the runtime version the App runs on.
- Hostname — the App's unique hostname with a copy button. This is the base URL for every API call to the App.
- Version — the deployed workflow name and version (for example
v3), with a link that opens that exact version in the editor. - Authorization — Enabled (private) or Disabled (public).
- Deployed by — who deployed it and when.
- Re-deploy — opens the deploy panel to roll the App to another workflow version.
- Edit, archive/restore, and delete actions.
The App tabs
Monitoring
The MONITORING tab ("Deployment monitoring") charts the App's usage over a selectable date range, bucketed By: Hour, By: Day, By: Week, or By: Month: total tokens cost (USD), total tokens used, request count, and latency.
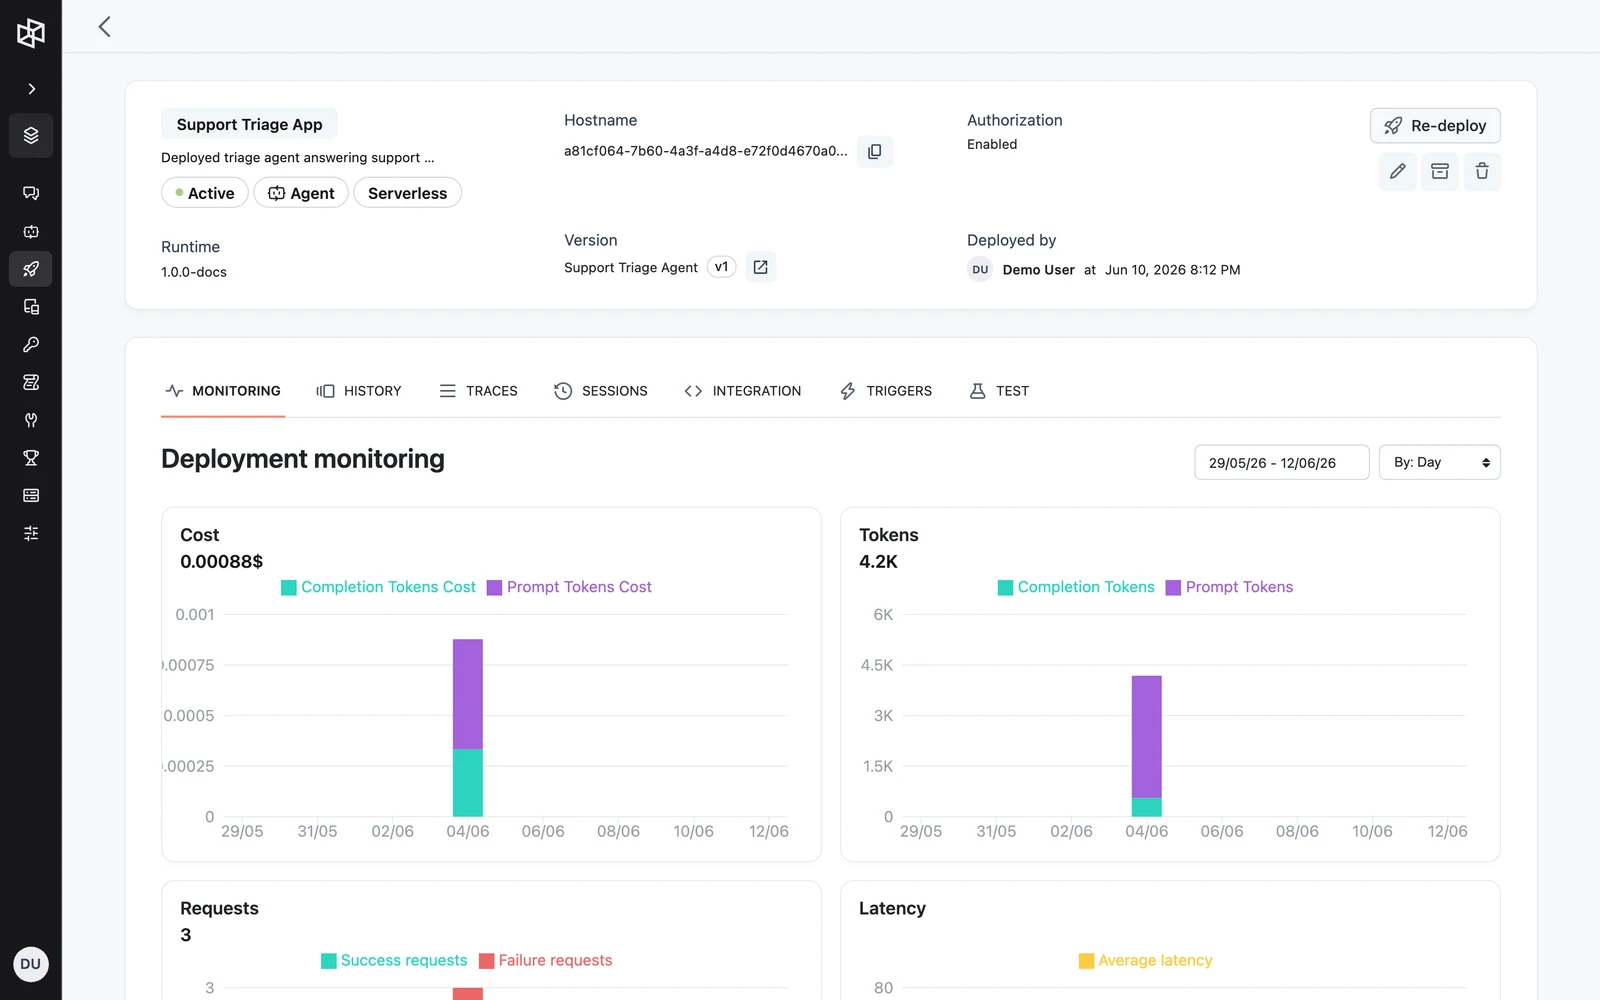
See Monitoring, history, and traces for details.
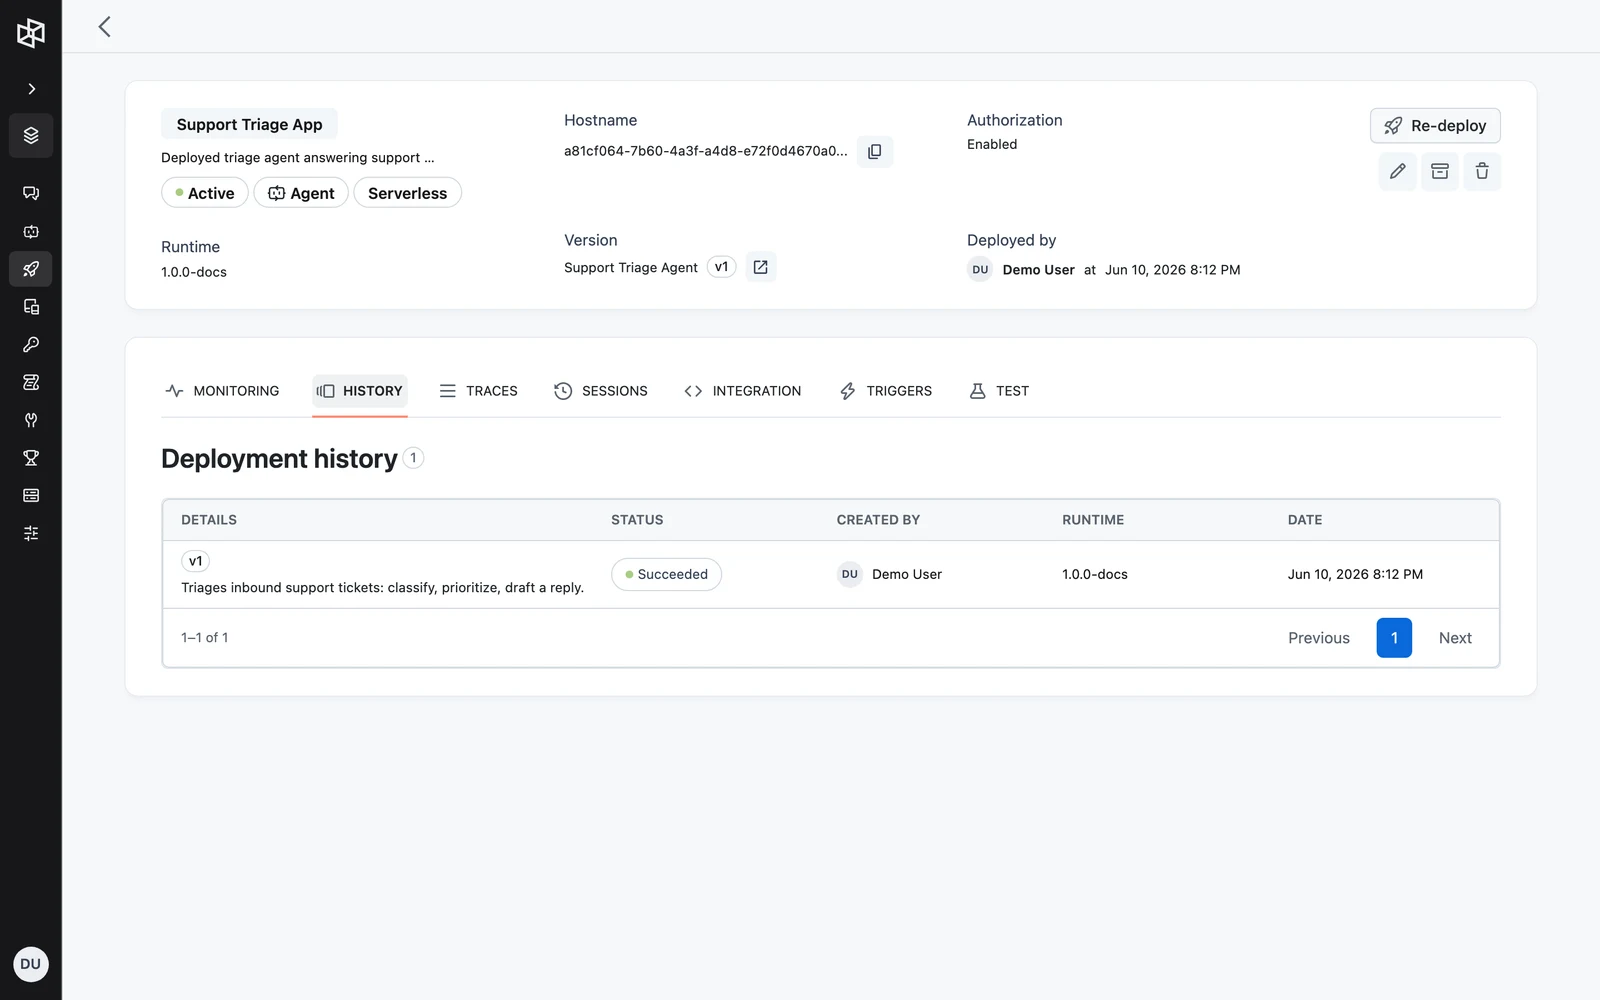
History
The HISTORY tab lists every deployment of this App — columns DETAILS (workflow version), STATUS, CREATED BY, RUNTIME, and DATE — so you can see exactly which version was live when. See Deployment history and rollback.
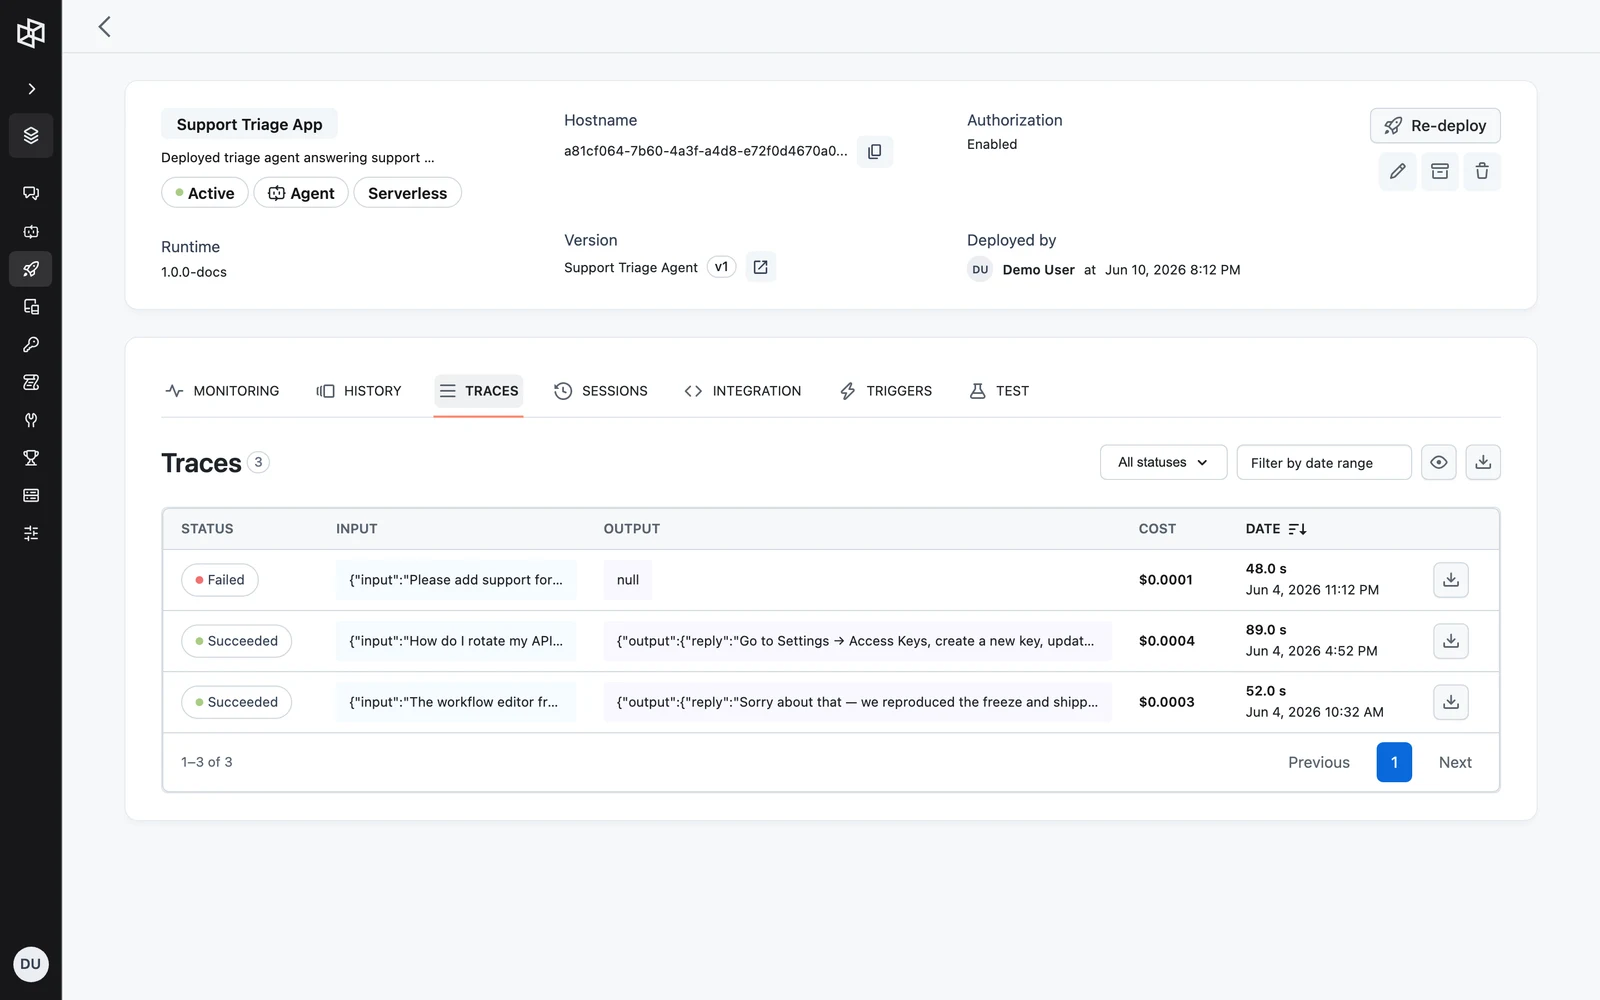
Traces
The TRACES tab lists the recorded execution tree of each Run, filterable by status and start time, with a download option for offline analysis. Open a trace to inspect every node execution. See Monitoring, history, and traces.
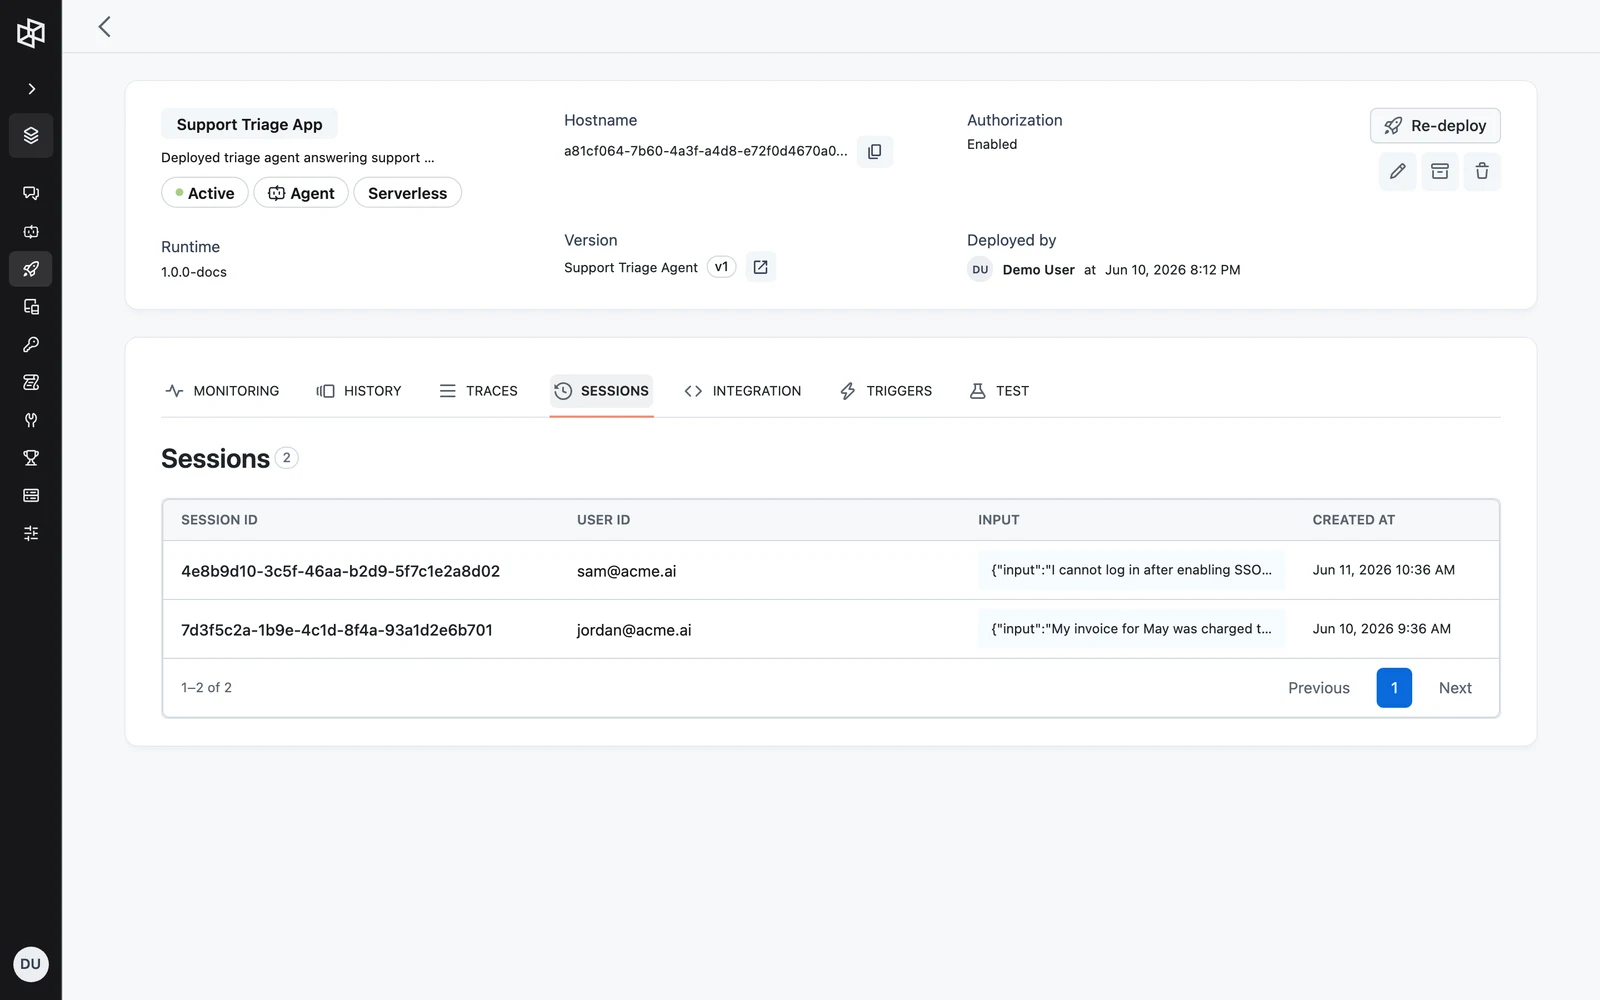
Sessions
The SESSIONS tab lists conversation sessions — runs grouped by session_id — with their messages. Use it for chat-style Apps where one user holds a multi-turn conversation. See Conversations and sessions.
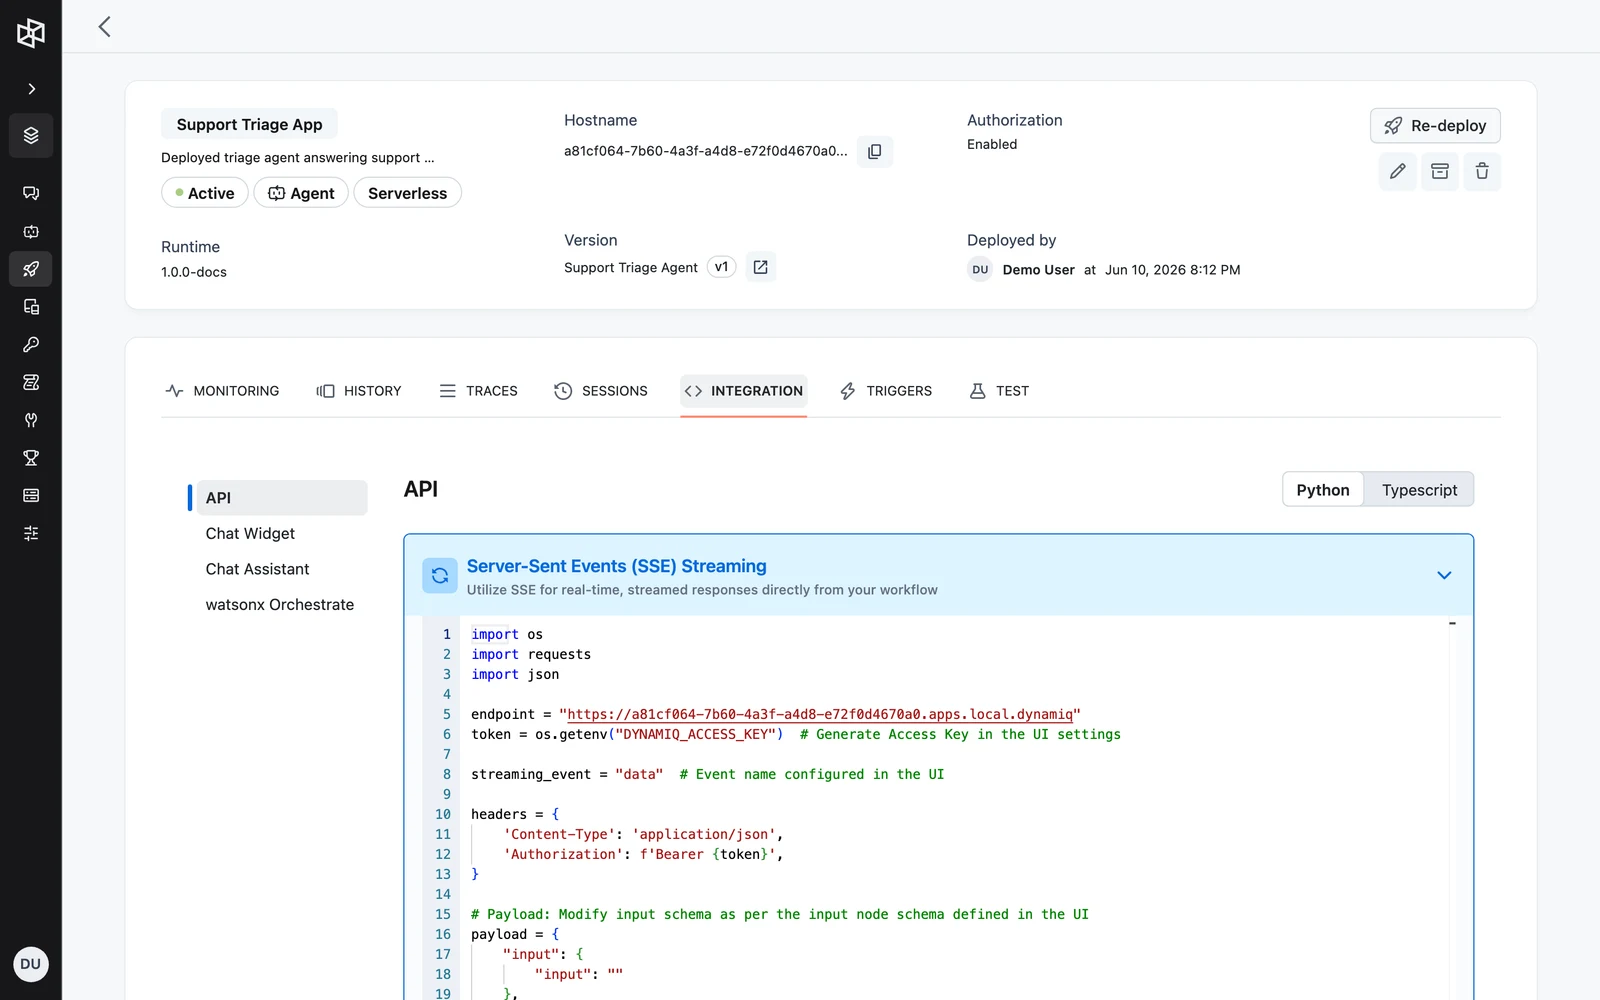
Integration
The INTEGRATION tab is the fastest way to wire the App into your code. A side menu offers four surfaces:
- API — ready-to-copy Python and Typescript snippets, prefilled with your App's hostname and the fields of your workflow's Input node, for five patterns: Server-Sent Events (SSE) Streaming, Regular HTTP Requests, WebSocket Connection, Async Callback, and Streaming Run with Human Feedback. The same request shapes are documented in Call your App over HTTP.
- Chat Widget — an embeddable chat widget pointed at the App. See Chat widget and assistant.
- Chat Assistant — the
@dynamiq/assistantReact component. - watsonx Orchestrate — exposes the App to IBM watsonx Orchestrate.
Triggers
The TRIGGERS tab manages scheduled and event-based invocations of the App. Create a Trigger, activate or deactivate it, run it manually, and inspect its received events. See Triggers.

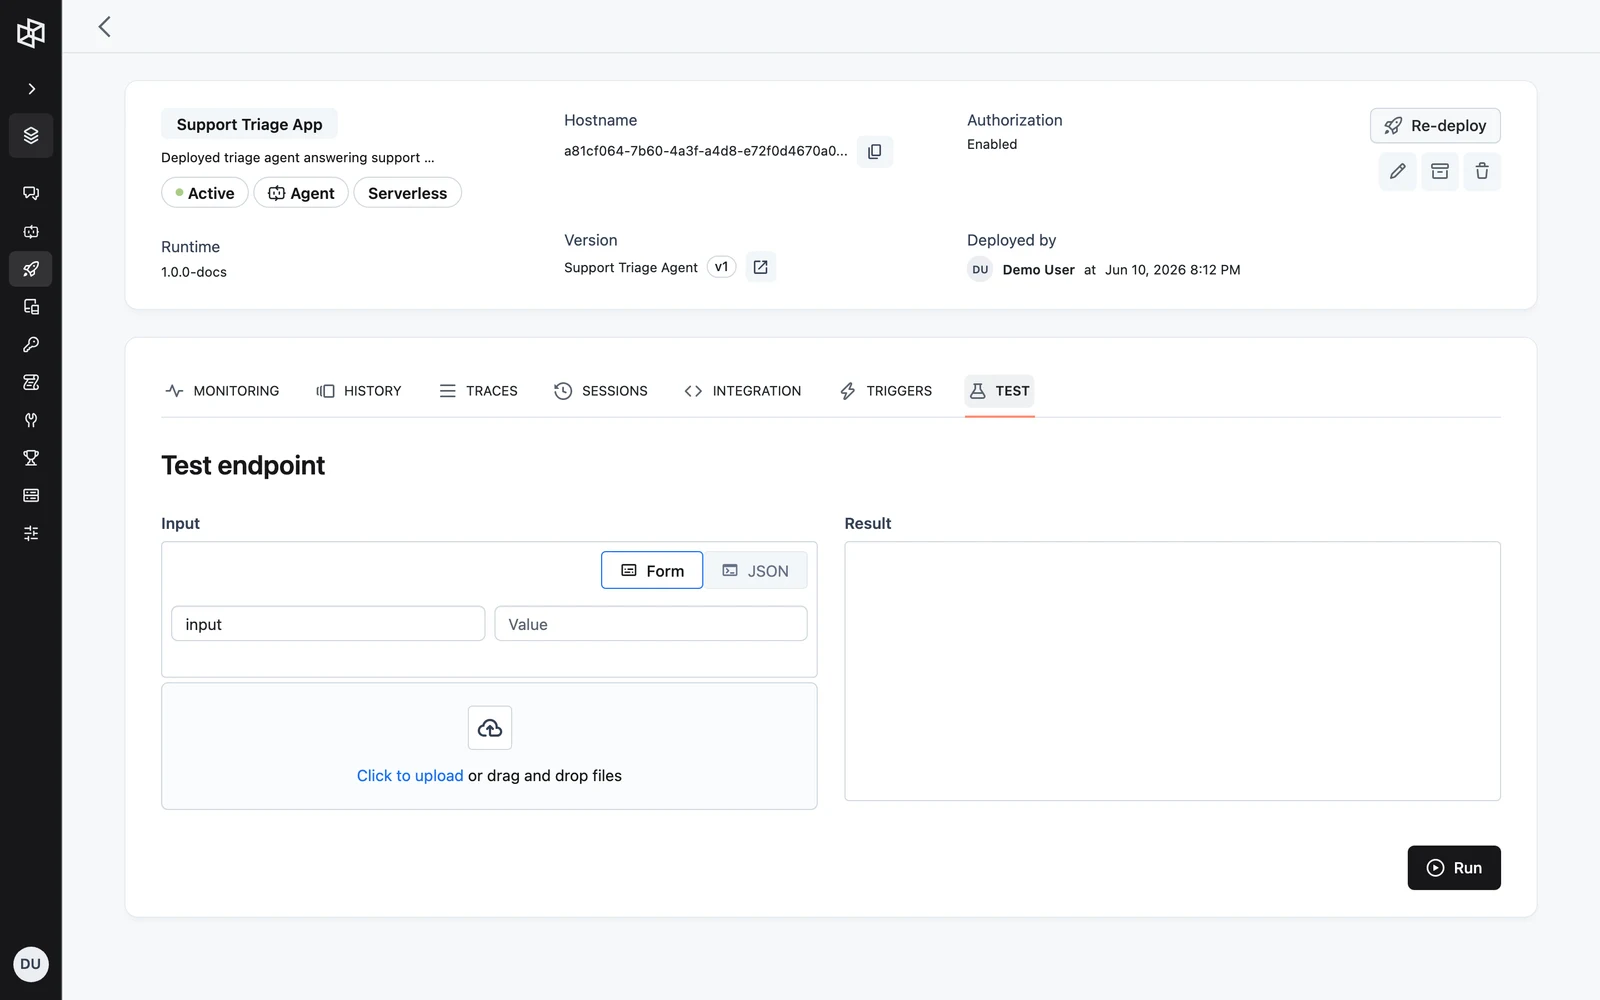
Test
The TEST tab ("Test endpoint") runs the App directly from the browser. The Input form is pre-populated with one field per Input node field of the deployed workflow version; you can also attach files. Click Run and the Result pane shows the JSON output — no Access Key or HTTP client needed.
Deploy via the management API
The same operations are available on the management API (https://api.getdynamiq.ai), authenticated with a Personal Access Token. Create an App with POST /v1/apps, then push new versions with POST /v1/apps/{app_id}/deploy:
# Create the App
curl -X POST "https://api.getdynamiq.ai/v1/apps" \
  -H "Authorization: Bearer $DYNAMIQ_PERSONAL_ACCESS_TOKEN" \
  -H "Content-Type: application/json" \
  -d '{
    "name": "support-agent",
    "description": "Customer support agent",
    "project_id": "11111111-1111-1111-1111-111111111111",
    "workflow_id": "22222222-2222-2222-2222-222222222222",
    "workflow_version_id": "33333333-3333-3333-3333-333333333333",
    "access_control": {"access_type": "private"},
    "deployment_config": {"deployment_type": "serverless"}
  }'

# Redeploy a new workflow version onto the existing App
curl -X POST "https://api.getdynamiq.ai/v1/apps/$APP_ID/deploy" \
  -H "Authorization: Bearer $DYNAMIQ_PERSONAL_ACCESS_TOKEN" \
  -H "Content-Type: application/json" \
  -d '{
    "workflow_id": "22222222-2222-2222-2222-222222222222",
    "workflow_version_id": "44444444-4444-4444-4444-444444444444"
  }'
import os
import requests
base = "https://api.getdynamiq.ai"
headers = {
"Authorization": f"Bearer {os.getenv('DYNAMIQ_PERSONAL_ACCESS_TOKEN')}",
"Content-Type": "application/json",
}
# Create the App
app = requests.post(f"{base}/v1/apps", headers=headers, json={
"name": "support-agent",
"description": "Customer support agent",
"project_id": "11111111-1111-1111-1111-111111111111",
"workflow_id": "22222222-2222-2222-2222-222222222222",
"workflow_version_id": "33333333-3333-3333-3333-333333333333",
"access_control": {"access_type": "private"},
"deployment_config": {"deployment_type": "serverless"},
}).json()["data"]
# Redeploy a new workflow version onto the existing App
deployment = requests.post(f"{base}/v1/apps/{app['id']}/deploy", headers=headers, json={
"workflow_id": "22222222-2222-2222-2222-222222222222",
"workflow_version_id": "44444444-4444-4444-4444-444444444444",
}).json()["data"]
print(deployment)const base = "https://api.getdynamiq.ai";
const headers = {
Authorization: `Bearer ${process.env.DYNAMIQ_PERSONAL_ACCESS_TOKEN}`,
"Content-Type": "application/json",
};
// Create the App
const createRes = await fetch(`${base}/v1/apps`, {
method: "POST",
headers,
body: JSON.stringify({
name: "support-agent",
description: "Customer support agent",
project_id: "11111111-1111-1111-1111-111111111111",
workflow_id: "22222222-2222-2222-2222-222222222222",
workflow_version_id: "33333333-3333-3333-3333-333333333333",
access_control: { access_type: "private" },
deployment_config: { deployment_type: "serverless" },
}),
});
const { data: app } = await createRes.json();
// Redeploy a new workflow version onto the existing App
const deployRes = await fetch(`${base}/v1/apps/${app.id}/deploy`, {
method: "POST",
headers,
body: JSON.stringify({
workflow_id: "22222222-2222-2222-2222-222222222222",
workflow_version_id: "44444444-4444-4444-4444-444444444444",
}),
});
console.log(await deployRes.json());deployment_config accepts deployment_type of serverless or server_based; for server_based add config.autoscaling with min_replicas, max_replicas, and target_cpu. Omit workflow_version_id to deploy the latest version. Omit runtime_id to deploy on the latest runtime.
Next steps
Overview
What you can deploy on Dynamiq — workflow Apps, AI models, vector databases, and services — and how the deployment lifecycle works.
Call Your App over HTTP
The full HTTP contract for invoking a deployed Dynamiq App — auth, request body, synchronous responses, SSE streaming, async callbacks, and error codes.