End-User Connection Requirements
Let each end user of a deployed App link their own account or credentials — define requirements at build time, detect unmet ones at run time, and fulfill them via the hosted connect page or the connect API.
When a workflow node needs a Connection — or an Action tool needs a linked account — you have two choices at build time: authorize it yourself, so every run of the deployed App uses your credentials, or flag it as a requirement, so every end user must connect their own account before the App runs for them. This page covers the full requirement lifecycle: defining requirements on a workflow, discovering unmet requirements for a user, and getting them fulfilled through the hosted connect page or your own UI.
How requirements work
A requirement is a named placeholder attached to a workflow. Instead of pointing a node at a concrete Connection or account, you point it at the requirement. The deployed App then resolves the placeholder per end user at run time, using the connection that user linked for that App.
There are two requirement types:
| Type | What the end user provides | Spec |
|---|---|---|
connection | Credentials (or an OAuth grant) for one of Dynamiq's connection types — an API key, OAuth consent, etc. | {"type": "dynamiq.connections.OpenAI"} — the connection type the node needs |
pipedream_account | An action connector account — the linked third-party account (Gmail, Slack, …) that an Action tool acts through | {"app_slug": "gmail"} — the app the Action targets |
The lifecycle is always the same:
- Build time — the builder creates a requirement on the workflow and selects it on the node instead of a concrete Connection or account.
- Deploy — the App is deployed; the requirement travels with the workflow version.
- Discover — before running the App for a user, your backend asks the App whether that
user_idhas satisfied all requirements. - Fulfill — for users with pending requirements, you mint a short-lived connect token and either send them to the hosted connect page or drive the connect API from your own UI.
- Run — you call the App with the same
user_id; the platform resolves each flagged node to that user's linked connection or account.
The user_id is any stable string your application uses to identify the end user — the same field you send with runs for conversations and sessions. Requirements are tracked per App per user_id.
Shared connection or per-user requirement?
| Choose | When |
|---|---|
| Connection / account selected at build time | The credential belongs to your organization: your LLM provider key, your internal database, a service account. Every end user's runs share it, and end users never see a setup step. |
| Requirement | The node must act as the end user: reading their inbox, posting to their workspace, querying their tenant. Each user authorizes once per App; credentials are stored as system-managed, end-user-scoped connections that other users and runs can't touch. |
A single workflow can mix both — for example, a shared connection for the LLM node and a per-user requirement for the email Action the agent calls.
Define requirements at build time
Requirements belong to a workflow, so save the workflow first — the Requirements tab is disabled on an unsaved workflow.
Connection-backed nodes
Open the connection chooser
Select the node on the canvas and click its Connection field in the configuration panel. A segmented control appears with two tabs: Connections (concrete connections, shared by all users) and Requirements.
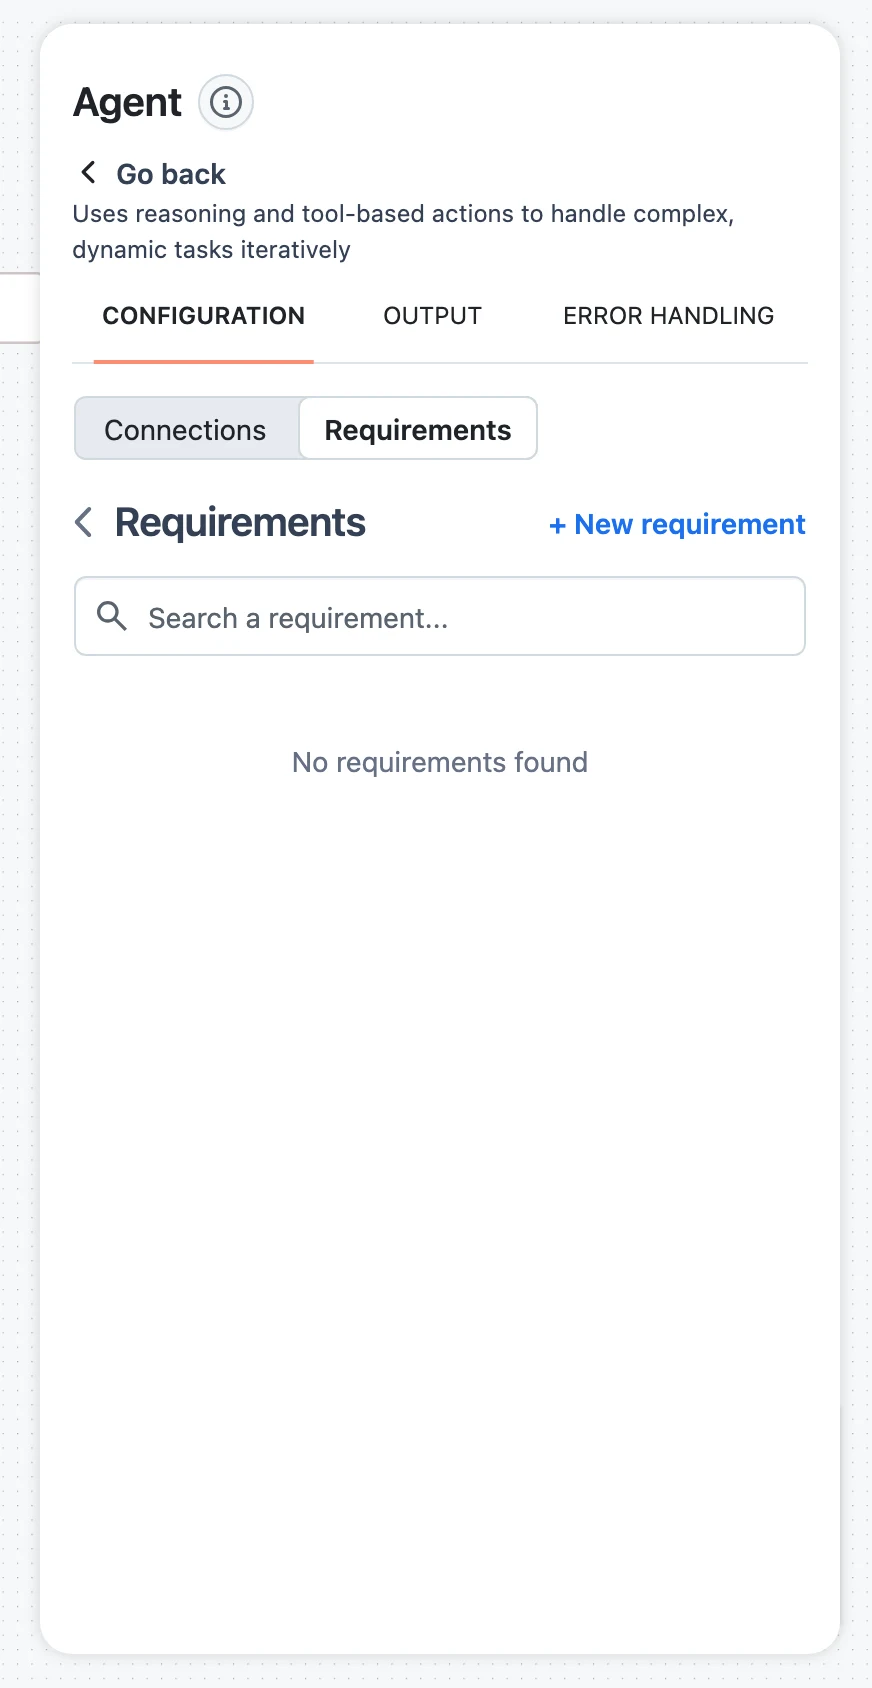
Create the requirement
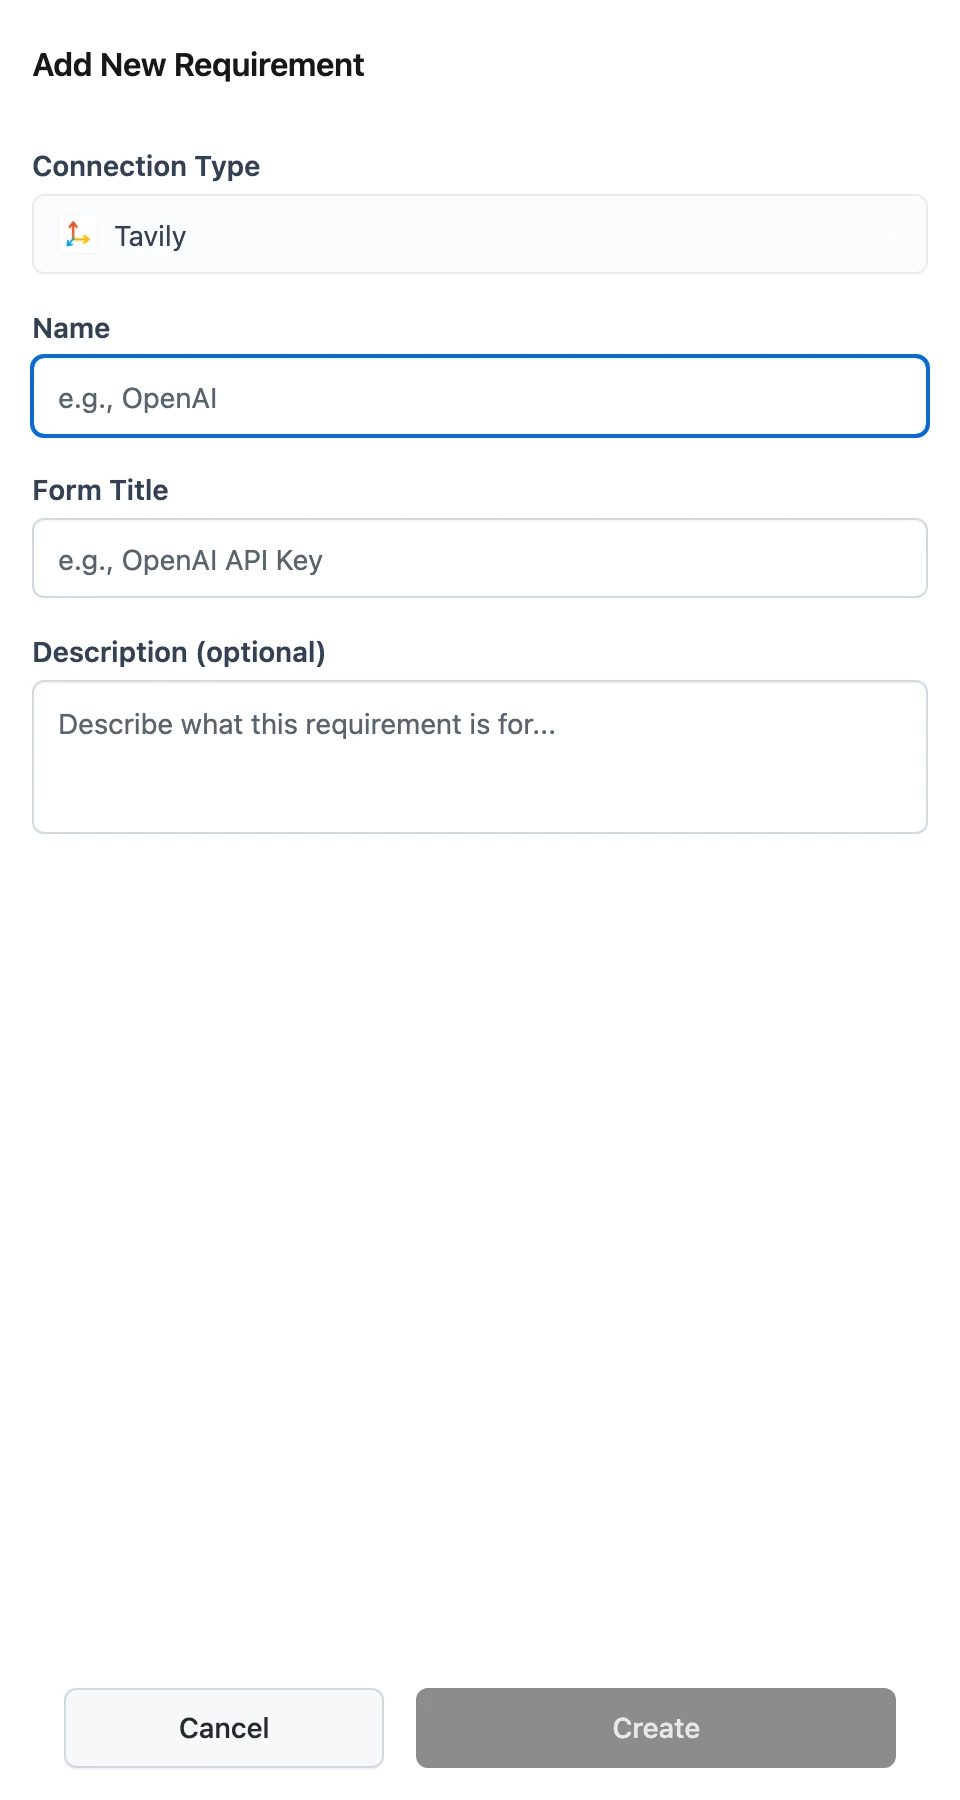
On the Requirements tab, click + New requirement. The Add New Requirement sheet asks for:
- Connection Type — limited to the types this node supports; locked after creation.
- Name — internal identifier, e.g.
openai; locked after creation. - Form Title — what end users see on the connect page, e.g.
OpenAI API Key(1–128 characters). - Description (optional) — helper text under the title (up to 256 characters).
Click Create. The new requirement is selected on the node automatically.
Verify the selection
The node's Connection field now shows the requirement name with a (Requirement) suffix instead of a connection name. Multiple nodes can reference the same requirement. Deleting a requirement clears it from every node that references it.
Action tools
For an Action node, the account field has its own Accounts | Requirements segmented control. Accounts lets the builder link an account on the spot (shared by all end users); Requirements lists this app's requirements with the same + New requirement flow — the Name and Form Title are prefilled from the app (for example Gmail Account), and the app slug is set automatically from the Action's configuration.
API equivalent
Requirements have a CRUD API on the management API (https://api.getdynamiq.ai, authenticated with a Personal Access Token):
| Method & path | Body | Notes |
|---|---|---|
GET /v1/workflows/{workflow_id}/requirements | — | Paginated list |
POST /v1/workflows/{workflow_id}/requirements | {name, type, form, spec} | type is connection or pipedream_account |
GET /v1/workflows/{workflow_id}/requirements/{requirement_id} | — | Single requirement |
PUT /v1/workflows/{workflow_id}/requirements/{requirement_id} | {form} | Only the form (title, description) is editable |
DELETE /v1/workflows/{workflow_id}/requirements/{requirement_id} | — | Returns {"message": "deleted"} |
curl -X POST "https://api.getdynamiq.ai/v1/workflows/$WORKFLOW_ID/requirements" \
  -H "Content-Type: application/json" \
  -H "Authorization: Bearer $DYNAMIQ_PAT" \
  -d '{
    "name": "openai",
    "type": "connection",
    "form": {
      "title": "OpenAI API Key",
      "description": "Used to run the assistant on your own OpenAI account."
    },
    "spec": {
      "type": "dynamiq.connections.OpenAI"
    }
  }'
curl -X POST "https://api.getdynamiq.ai/v1/workflows/$WORKFLOW_ID/requirements" \
-H "Content-Type: application/json" \
-H "Authorization: Bearer $DYNAMIQ_PAT" \
-d '{
"name": "gmail",
"type": "pipedream_account",
"form": {
"title": "Gmail Account",
"description": "The agent sends email replies from this account."
},
"spec": {
"app_slug": "gmail"
}
}'Both return the created requirement under data:
{
  "data": {
    "id": "7b3f1c2a-9d4e-4f6b-8a1c-2e5d7f9b0c3d",
    "type": "connection",
    "form": {
      "title": "OpenAI API Key",
      "description": "Used to run the assistant on your own OpenAI account."
    },
    "spec": {
      "type": "dynamiq.connections.OpenAI"
    },
    "workflow_id": "0d9e8f7a-6b5c-4d3e-2f1a-0b9c8d7e6f5a",
    "name": "openai"
  }
}
Creating a requirement via the API does not wire it to a node — set the node's connection (or the Action's account) to a requirement reference in the workflow definition, which is what the UI does when you select it.
Discover unmet requirements
Before running the App for a user, ask the App itself. Both endpoints live on the App hostname and — like any call to a private App — take an Access Key when Endpoint Authorization is enabled. Only requirements actually referenced by a node in the deployed workflow version are reported.
GET https://<your-app-hostname>/v1/requirements— every requirement the deployed version declares.GET https://<your-app-hostname>/v1/requirements/status?user_id=<id>— the same list filtered to what this user still has to do.
The status response is either complete:
{ "status": "completed" }or lists what is missing:
{
  "status": "incomplete",
  "unsatisfied": [
    {
      "id": "7b3f1c2a-9d4e-4f6b-8a1c-2e5d7f9b0c3d",
      "type": "connection",
      "form": {
        "title": "OpenAI API Key",
        "description": "Used to run the assistant on your own OpenAI account."
      },
      "spec": {
        "type": "connection",
        "data": { "type": "dynamiq.connections.OpenAI" }
      },
      "workflow_id": "0d9e8f7a-6b5c-4d3e-2f1a-0b9c8d7e6f5a",
      "name": "openai"
    }
  ]
}
A connection requirement counts as satisfied only while the user's linked connection is active — an OAuth flow the user started but never finished stays unsatisfied.
Connect tokens and the hosted connect page
To let a user fulfill requirements, mint a connect token — a bearer token scoped to one App and one user_id, valid for 24 hours:
curl -X POST "https://<your-app-hostname>/v1/connect/tokens" \
  -H "Content-Type: application/json" \
  -H "Authorization: Bearer $DYNAMIQ_ACCESS_KEY" \
  -d '{"user_id": "user-42"}'
{
"token": "eyJhbGciOi...",
"url": "https://<dynamiq-ui-host>/connect?token=eyJhbGciOi...",
"expires_at": "2026-06-12T09:30:00Z"
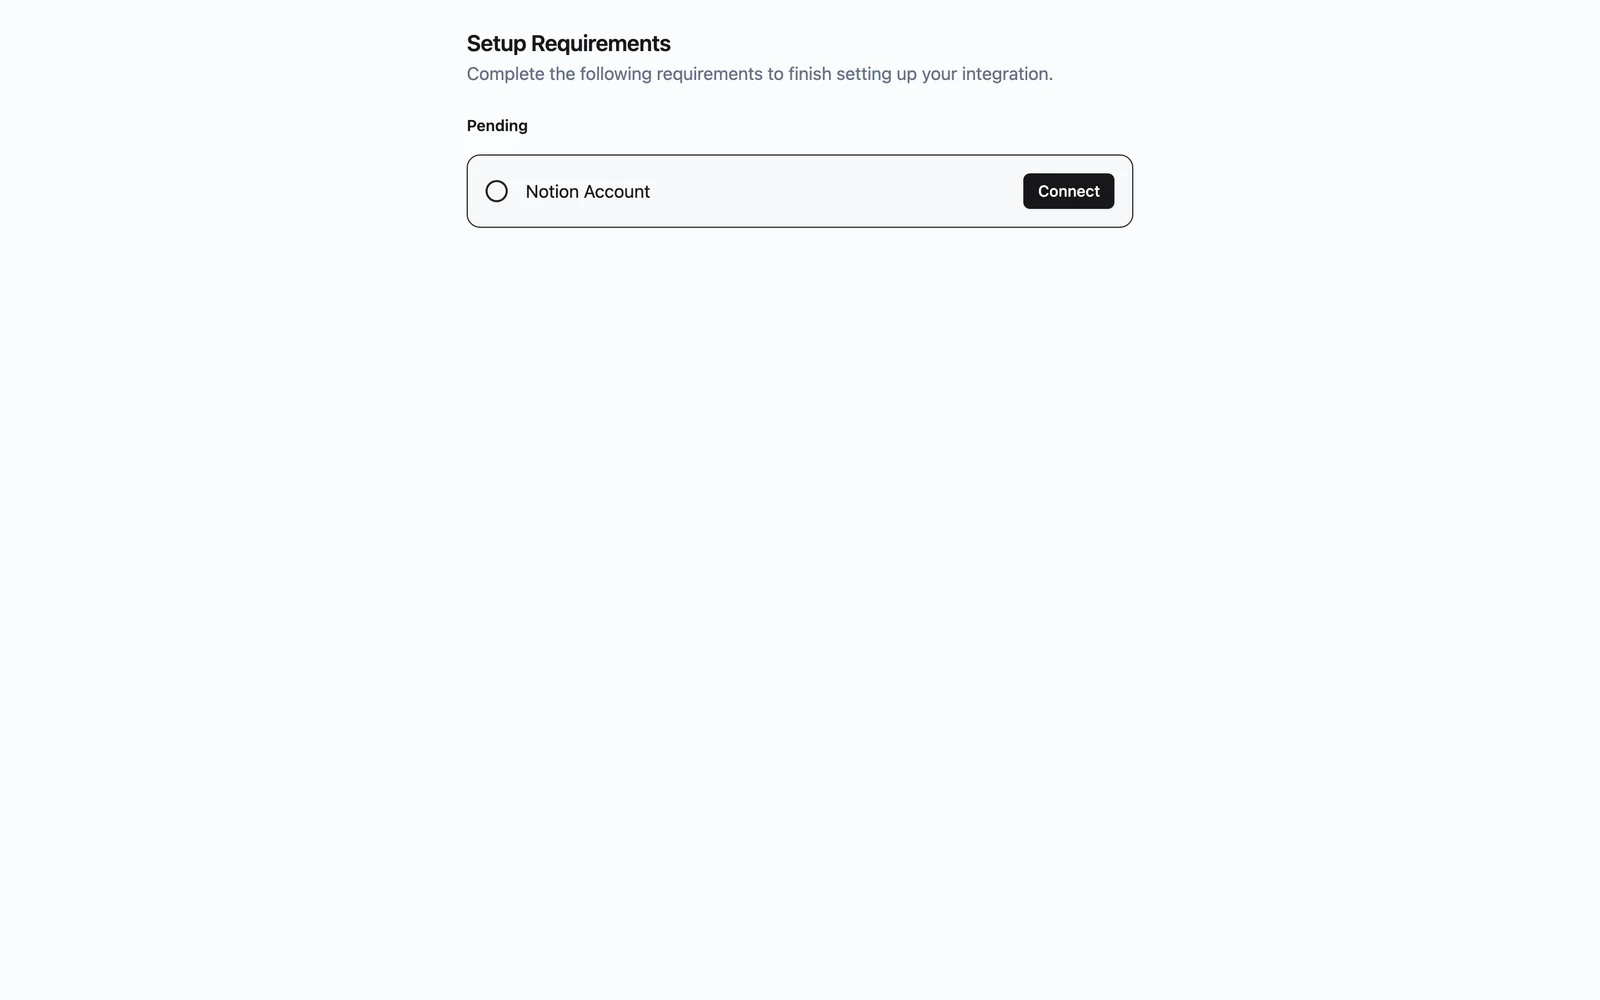
}The url points to the hosted Setup Requirements page. Send the user there (link, email, or redirect) and they see:
- A Pending section listing each unmet requirement by its form title and description, with a Connect button.
- A Completed section for requirements they have already fulfilled.
For a connection requirement, Connect opens a side sheet with the credential form for that connection type (for example an API key field); submitting it stores the credentials and marks the requirement completed. For an action connector account requirement, Connect opens the account authorization page in a new tab; once the user finishes linking the account, the requirement flips to completed.
Connect tokens expire after 24 hours and are scoped to a single user and App. Mint a fresh token each time you send a user to the page — don't store or reuse them across users.
Fulfill requirements from your own UI
If you'd rather keep users inside your product, the same connect token authorizes the connect API on the management API (https://api.getdynamiq.ai). All five endpoints take the connect token as the Bearer token — no Access Key or Personal Access Token:
| Method & path | Body | Returns |
|---|---|---|
GET /v1/connect/requirements | — | All requirements for the token's App |
GET /v1/connect/requirements/status | — | Same list with a per-item status: pending or completed |
POST /v1/connect/requirements/{requirement_id}/credentials | {type, config} | {"message": "created"} — submit credentials for a non-OAuth connection requirement |
POST /v1/connect/requirements/{requirement_id}/oauth2/authorize | — | {"data": {"url": "..."}} — provider consent URL for an OAuth connection requirement |
POST /v1/connect/requirements/{requirement_id}/pipedream/authorize | — | {"data": {"url": "..."}} — hosted authorization URL for an action connector account requirement |
A status item looks like this — spec.data.type tells you which credential form to render, spec.data.app_slug which account to link:
{
  "data": [
    {
      "id": "7b3f1c2a-9d4e-4f6b-8a1c-2e5d7f9b0c3d",
      "type": "connection",
      "title": "OpenAI API Key",
      "description": "Used to run the assistant on your own OpenAI account.",
      "status": "pending",
      "spec": {
        "type": "connection",
        "data": { "type": "dynamiq.connections.OpenAI" }
      }
    },
    {
      "id": "1f2e3d4c-5b6a-4789-9a0b-1c2d3e4f5a6b",
      "type": "pipedream_account",
      "title": "Gmail Account",
      "status": "pending",
      "spec": {
        "type": "pipedream_account",
        "data": { "app_slug": "gmail" }
      }
    }
  ]
}
Rules the API enforces:
- The
typein a credentials submission must exactly match the requirement's connection type, or you get aconnection type mismatcherror. - OAuth connection types (Google, Microsoft, Notion, and the other OAuth connections) are rejected by the credentials endpoint — use
oauth2/authorizeand redirect the user to the returned URL instead. The connection stays incomplete (and the requirement pending) until the user finishes the provider's consent screen. pipedream/authorizeonly works onpipedream_accountrequirements, andcredentials/oauth2/authorizeonly onconnectionrequirements.
Connections created this way are system-managed and end-user-scoped: they never appear in the project's Connections list and are only used for this user's runs of this App.
There is also a server-side shortcut that skips connect tokens entirely: POST https://<your-app-hostname>/v1/connections with {"user_id", "requirement_id", "type", "config"} (Access Key auth) creates and activates an end-user connection directly. Use it when your backend already holds the user's credentials — never expose it to browsers.
The full round trip
Check status, mint a token, fulfill what's pending, then run the App. Replace the hostname, ids, and connection types with your own.
# 1. Is user-42 ready to run the app?
curl "https://<your-app-hostname>/v1/requirements/status?user_id=user-42" \
  -H "Authorization: Bearer $DYNAMIQ_ACCESS_KEY"

# 2. Not yet ("status": "incomplete") - mint a 24h connect token
curl -X POST "https://<your-app-hostname>/v1/connect/tokens" \
  -H "Content-Type: application/json" \
  -H "Authorization: Bearer $DYNAMIQ_ACCESS_KEY" \
  -d '{"user_id": "user-42"}'
# -> {"token": "<CONNECT_TOKEN>", "url": "...", "expires_at": "..."}

# 3. List what is pending, with specs
curl "https://api.getdynamiq.ai/v1/connect/requirements/status" \
  -H "Authorization: Bearer $CONNECT_TOKEN"

# 4a. Fulfill a connection requirement with credentials
curl -X POST "https://api.getdynamiq.ai/v1/connect/requirements/$REQUIREMENT_ID/credentials" \
  -H "Content-Type: application/json" \
  -H "Authorization: Bearer $CONNECT_TOKEN" \
  -d '{
    "type": "dynamiq.connections.OpenAI",
    "config": {"api_key": "<the end user'\''s key>"}
  }'

# 4b. Or get an authorization URL for an action connector account requirement
curl -X POST "https://api.getdynamiq.ai/v1/connect/requirements/$REQUIREMENT_ID/pipedream/authorize" \
  -H "Authorization: Bearer $CONNECT_TOKEN"
# -> {"data": {"url": "https://..."}}  open this URL for the user

# 5. Re-check, then run the app with the same user_id
curl "https://<your-app-hostname>/v1/requirements/status?user_id=user-42" \
  -H "Authorization: Bearer $DYNAMIQ_ACCESS_KEY"
import os
import requests
app_endpoint = "https://<your-app-hostname>"
api_base = "https://api.getdynamiq.ai"
end_user_id = "user-42"
app_headers = {"Authorization": f"Bearer {os.getenv('DYNAMIQ_ACCESS_KEY')}"}
# 1. Is the end user ready to run the app?
status = requests.get(
f"{app_endpoint}/v1/requirements/status",
params={"user_id": end_user_id},
headers=app_headers,
).json()
if status["status"] == "completed":
print("All requirements satisfied - run the app.")
else:
print("Unsatisfied:", [r["form"]["title"] for r in status["unsatisfied"]])
# 2. Mint a connect token (valid for 24 hours)
token = requests.post(
f"{app_endpoint}/v1/connect/tokens",
json={"user_id": end_user_id},
headers=app_headers,
).json()
# Option A: hand off to the hosted connect page
print("Hosted setup page:", token["url"])
# Option B: fulfill programmatically with the connect token
connect_headers = {"Authorization": f"Bearer {token['token']}"}
requirements = requests.get(
f"{api_base}/v1/connect/requirements/status",
headers=connect_headers,
).json()["data"]
for req in requirements:
if req["status"] == "completed":
continue
if req["type"] == "connection":
conn_type = req["spec"]["data"]["type"]
if conn_type == "dynamiq.connections.OpenAI":
# Non-OAuth connection: submit the user's credentials directly
requests.post(
f"{api_base}/v1/connect/requirements/{req['id']}/credentials",
json={"type": conn_type, "config": {"api_key": os.getenv("END_USER_OPENAI_KEY")}},
headers=connect_headers,
).raise_for_status()
else:
# OAuth connection: redirect the user to the consent URL
auth = requests.post(
f"{api_base}/v1/connect/requirements/{req['id']}/oauth2/authorize",
headers=connect_headers,
).json()
print("Send the user to:", auth["data"]["url"])
elif req["type"] == "pipedream_account":
# Action connector account: open the hosted authorization URL
auth = requests.post(
f"{api_base}/v1/connect/requirements/{req['id']}/pipedream/authorize",
headers=connect_headers,
).json()
print("Send the user to:", auth["data"]["url"])const appEndpoint = "https://<your-app-hostname>";
const apiBase = "https://api.getdynamiq.ai";
const endUserId = "user-42";
const appHeaders = {
"Content-Type": "application/json",
Authorization: `Bearer ${process.env.DYNAMIQ_ACCESS_KEY}`,
};
interface RequirementStatus {
id: string;
type: "connection" | "pipedream_account";
title: string;
status: "pending" | "completed";
spec: { type: string; data: { type?: string; app_slug?: string } };
}
async function ensureRequirements() {
// 1. Is the end user ready to run the app?
const statusRes = await fetch(
`${appEndpoint}/v1/requirements/status?user_id=${encodeURIComponent(endUserId)}`,
{ headers: appHeaders },
);
const status = await statusRes.json();
if (status.status === "completed") {
console.log("All requirements satisfied - run the app.");
return;
}
// 2. Mint a connect token (valid for 24 hours)
const tokenRes = await fetch(`${appEndpoint}/v1/connect/tokens`, {
method: "POST",
headers: appHeaders,
body: JSON.stringify({ user_id: endUserId }),
});
const { token, url } = await tokenRes.json();
// Option A: hand off to the hosted connect page
console.log("Hosted setup page:", url);
// Option B: fulfill programmatically with the connect token
const connectHeaders = {
"Content-Type": "application/json",
Authorization: `Bearer ${token}`,
};
const reqsRes = await fetch(`${apiBase}/v1/connect/requirements/status`, {
headers: connectHeaders,
});
const requirements: RequirementStatus[] = (await reqsRes.json()).data;
for (const req of requirements) {
if (req.status === "completed") continue;
if (req.type === "connection" && req.spec.data.type === "dynamiq.connections.OpenAI") {
// Non-OAuth connection: submit the user's credentials directly
await fetch(`${apiBase}/v1/connect/requirements/${req.id}/credentials`, {
method: "POST",
headers: connectHeaders,
body: JSON.stringify({
type: req.spec.data.type,
config: { api_key: process.env.END_USER_OPENAI_KEY },
}),
});
} else if (req.type === "connection") {
// OAuth connection: redirect the user to the consent URL
const authRes = await fetch(
`${apiBase}/v1/connect/requirements/${req.id}/oauth2/authorize`,
{ method: "POST", headers: connectHeaders },
);
console.log("Send the user to:", (await authRes.json()).data.url);
} else {
// Action connector account: open the hosted authorization URL
const authRes = await fetch(
`${apiBase}/v1/connect/requirements/${req.id}/pipedream/authorize`,
{ method: "POST", headers: connectHeaders },
);
console.log("Send the user to:", (await authRes.json()).data.url);
}
}
}
ensureRequirements();Once the status check returns "completed", call the App with the same user_id — the platform resolves every requirement-flagged node to that user's linked connection or account for the run.
Scoping reference
Three credential systems coexist on the platform — don't mix them up:
| Mechanism | Scope | Where it's set up |
|---|---|---|
| Connection selected on a node at build time | Shared — every run, every end user | Workflow canvas / Connections |
Workflow requirement (connection or pipedream_account) | One per end user per App — always per-user, never shared | Hosted connect page or connect API |
| Chat Connectors | Per platform user in Chat | Chat settings — a separate system from App requirements |
Troubleshooting
Next steps
Connections
Connection types, scopes, and how credentials are stored.
OAuth connections
Which connection types authorize via OAuth and how the flows work.
Call your App over HTTP
Invoke the App once requirements are satisfied.
Conversations and sessions
Use the same user_id to keep multi-turn context per end user.